
Ethereum and smart contracts basics
An overview for confused developers
When I started reading about Ethereum a lot of concepts seem awkward and I was getting the feeling of missing something. Why would you want to have a global EVM machine that is terribly slow? Why do you have to pay for computations? What is ether and gas? What are smart contracts and how do they execute? I’ll try to give an overview on some basic concepts and flows without getting too much into details.
Ethereum network 🔗
Before moving on we need to have at least basic understanding of a blockchain technology. I highly recommend checking out excelent video by 3blue1brown.
Let’s simplify things a lot and think about ethereum as just a peer-to-peer network of nodes. The rules of the system are simple: there are accounts (like bank accounts) and ether (acting as a currency within the network). Ether can be transferred between accounts in a transaction, all the nodes are responsible for keeping track of all transactions in the ledger.
Lets say we have Alice, Bob, Charlie, Eve. They all run an instance of an ethereum client (geth, eth) on their machines which makes them part of a network . This client program connects to other nodes, provides an address within the network and allows for sending and receiving ether between accounts.
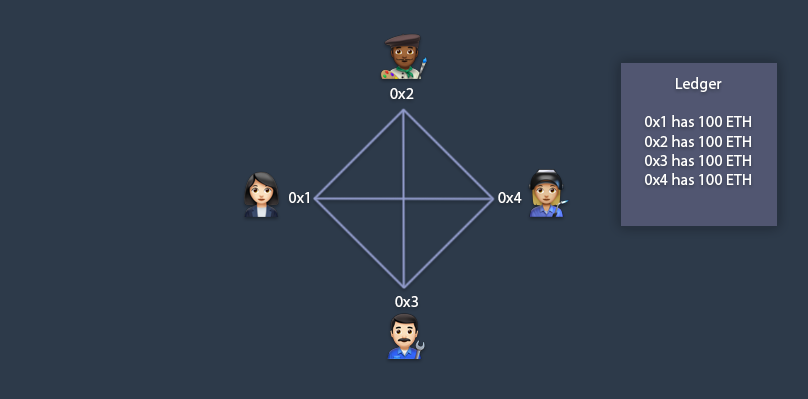
The account address usually looks like 0xf20739459439539744287b8a119970b74ccac2ec but lets assume Alice, Bob, Eve and Charlie have account addresses 0x1, 0x2, 0x3 and 0x4 respectively. By the way, there is no restrictions on how many accounts can each person have, we are just taking one-to-one mapping as an example.
If Alice wants to send 5 ether to Bob she uses her client of choice and that eventually creates a transaction stating “Alice payed 5 ether to Bob”.
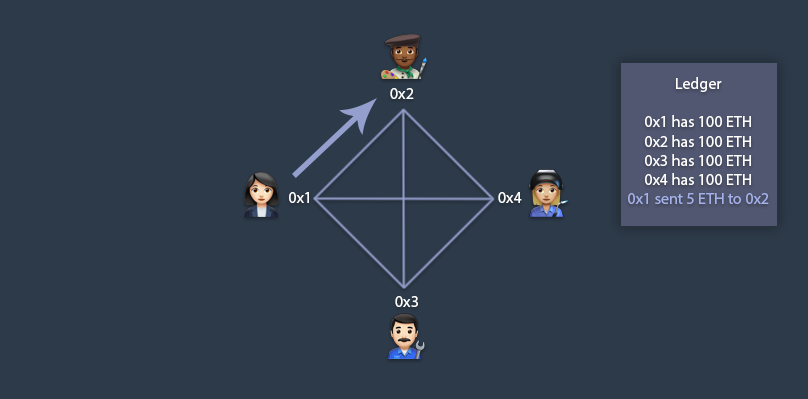
Alice account has 95 ether, Bob has 105 ether.
People sometimes mistakingly refer to accounts as wallets. First, wallet is just a piece of software that can manage your private keys. Second, this creates an impression that there is some kind of a storage where all of our tokens are stored which is not the case. There is no dictionary that maps accounts to their balances, there is no need to “register” an account in the system or anything like that— all we have is a list of transactions that specify sender id and receiver id. The balance on any account can be known by going through every transaction in the ledger and counting how many tokens went in and out. If there were no transactions — there wouldn’t be any accounts. For example, 0x1 sends 5 ETH to 0x2 means that there should be a transaction prior to this one stating that 0x1 received at least 5 ETH from someone else and has a right to spend it.
One day Alice and friends decided to go on a trip together. They think about how easier it would be to have a shared account to book hotels and tickets with instead of keeping track of how much who owns what. Alice creates an account in their network (e.g. creates a private-public key pair) and shares the keys with everybody. All agree to deposite some number of ether to that account and be responsible over their spendings.
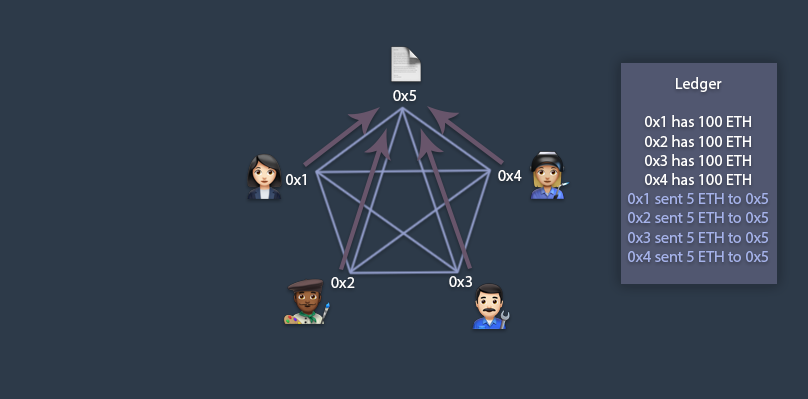
Everybody has a private key to their shared account and free to spend ether for anything. Alice uses the account to book aparatments.

This works great because they are friends and trust each other. But what if they weren’t? What if Eve decides to deposit only 1 ether but can spend collective 20 ETH? What if Bob decides to run away with the money or spend everything on the first day? Is there a way to define rules on how their budget can be spent? Meet “smart contract”.
Smart contracts 🤖
In order to solve all kinds of trust related problems, like a couple mentioned above, an idea of “smart contract” came up — a special kind of account in the network which looks like a regular account but is not controlled by a human. It can be programmed to execute all kind of instructions, check conditions, maintain state and, of course, receive and send ether.
A simple (but not very useful) example might be a contract that splits all received ether between Eve and Charlie: Alice sends 10 ETH to the contract, the contract is executed, 10 ETH is divided into two 5 ETH transactions that are sent to Eve and Charlie. By using smart contracts Alice, Eve and Charlie don’t need to have and trust a middle man to do this kind of work. They all agree on the rules of their interactions (splitting income), the rules are implemented in a contract and guaranteed to be enforced by the network.
In order to understand how smart contracts are executed we will move bottom up from execution environment.
Ethereum Virtual Machine 📟
Ethereum implements the capability to execute arbitrary code on the blockchain with “Ethereum Virtual Machine”. EVM is just an interpreter for the EVM assembly language. As the interpreter runs, it maintains a stack and a memory byte-array. The instruction set that looks like this:
PUSH1 0x60 PUSH1 0x40 MSTORE CALLVALUE ISZERO ...
EVM is very limited comparing to other virtual machines. There is no way to do IO, make API calls or generate random numbers which makes it a simple deterministic state machine.
Of course, writing programs in assembly is no fun so people created high level languages that compile into EVM assembly. We will take Solidity language as an example.
One thing to note — EVM is running in the context of ethereum network, in order to run the programs on EVM we have to either connect to existing network or create our own. The actual interpretation happens on the nodes that are running ethereum clients (geth, eth).
Here, for the lack of a better emoji, we used “📟” to represent EVM but the important thing is: everybody on the network run their own instance of the EVM. As part of transaction validation process some network participants (miners) are executing the code for a smart contract, basically at the same time. The resulting program state (along with other transactions data) is used for the proof-of-work algorithm to produce a new block in the chain.
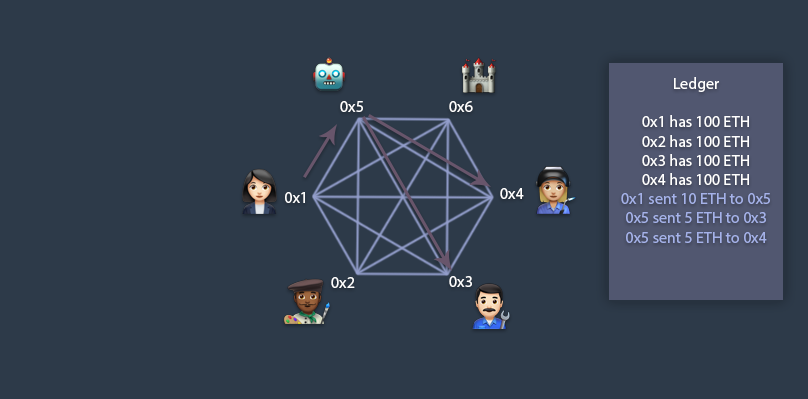
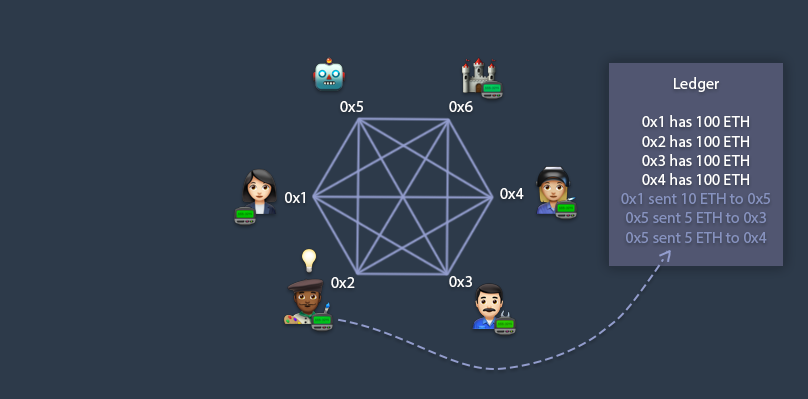
Let’s visualize an example of our simple smart contract. First, Alice creates a smart contract (more details later), it becomes available at address 0x5 represented with “🤖” on the picture above. In order to call a method on a contract she creates a transaction addressed to 0x5 that contains information about contract method invocation. Also, she can include some ether to transfer along with the transaction.
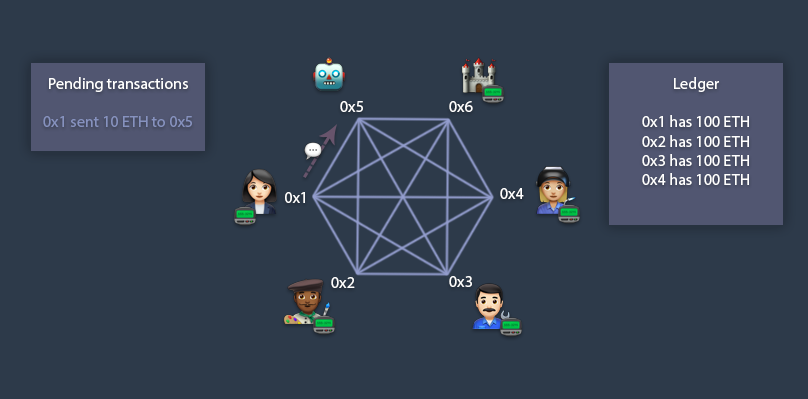
Now, the transaction is now in a pending state so all miners pick it up and try to validate it in a block. They realize that transaction recipient has code associated with it (e.g. it’s a smart contract), so they need to execute it first. Function name and parameters are taken from the transaction, everybody starts executing the same code on their EVM machines. The code that is being executed can also generate transactions depending on a contract’s logic — in our case it’s splitting whatever ether is received between 0x3 and 0x4. Those transactions are also added to the pending transactions pool. After that miners execute consensus algorithm (PoW/PoS) to validate pending transactions in a block.
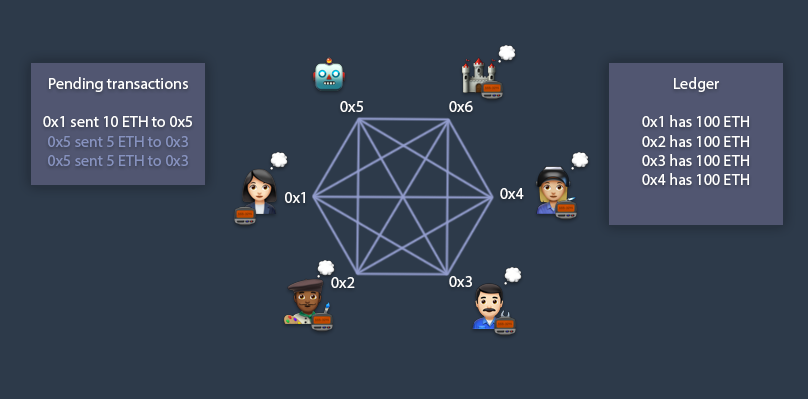
After executing the code two more transactions are added and now everybody is busy with validation 💭. After some time Bob (0x2) finds the solution for the cryptographic problem and validated transactions are added to the ledger.
Solidity 🤷
Solidity is a general purpose language created on top of EVM. Similarly to any OOP language it has a notion of classes (“contract”) and methods defined for that contract.
pragma solidity ^0.4.11;
contract greeter {
    function greet() constant returns (string) {
        return "Hello";
    }
}
Even though it’s Turing complete and you can implement arbitrary computations it is designed around the idea of sending and receiving digital tokens in some scriptable way with the ability to store some state. A function call mechanism is executed by sending a transaction to the contract (sort of like a message passing style). That transaction contains information about the caller (account address, amount of ether, etc.) and globally available as an object called msg.
Creating Smart Contract 🤖
Back to the Alice and friends shared account use case. Alice decides to create a smart contract that represents their shared account and can enforce all kind of rules.
Alice opens up her favourite text editor and writes the code for a contract. Here’s how it might look like this:
pragma solidity ^0.4.11;

contract MyContract {

    /*
        Maps account addresses to the amount of ether on their balance.
    */
    mapping (address => uint256) public balances;

    /*
        msg.sender and msg.value are implicitly available, contain information
        about the adress of a caller and amount of ether they sent with the call (in wei)
    */
    function deposit() payable returns(bool success) {
        balances[msg.sender] += msg.value;
        return true;
    }

    /*
        First verify that method called has deposited greater or equal amount of ether than
        he wants to withdraw.
        msg.sender.transfer function creates a transaction to send ether back to caller
    */
    function withdraw(uint value) returns(bool success) {
        if(balances[msg.sender] < value) throw;
        balances[msg.sender] -= value;
        msg.sender.transfer(value);
        return true;
    }

    /*
        Similar to withdraw but ether is sent to specified address, not the caller
    */
    function transfer(address to, uint value) returns(bool success) {
        if(balances[msg.sender] < value) throw;
        balances[msg.sender] -= value;
        to.transfer(value);
        return true;
    }
}
If you ever programmed in any OOP language the program should be pretty easy to understand. The contract allows us to do three basic things:
- Deposit some number of ether to the contract
- Withdraw ether but not more that was previously deposited
- Transfer deposited ether from contract’s account to some other account
We could implement as complex behaviour as we need like setting a limit on how much everybody can spend per day, collectively and individually.
Compilation 📄
Next, the code has to be compiled into EVM assembly. The compiler is available as a command line tool called solc.
npm install solc
It takes a list of input files as well one of the two mandatory options: --bin or --abi. The artifacts of a compilation are two files, one with a bytecode and another with ABI. Our next steps are:
solcjs MyContract.sol --bin
Generates MyContract_sol_MyContract.bin file with an actual byte code. This is what will be executed by EVM, represented as a sequence of hex numbers.
606060405260043610610062576000357c0100000000000000000000000000000000000000000000000000000000900463ffffffff16806327e235e3146100675780632e1a7d4d146100b4578063a9059cbb146100ef5...
solcjs MyContract.sol --abi
Generates MyContract_sol_MyContract.abi file with contract’s ABI interface. This is a json file that describes contract’s methods and their arguments. We need that in order to call the methods when the contract will be deployed since byte code doesn’t not have this information.
[{
 "constant": true,
 "inputs": [{
  "name": "",
  "type": "address"
 }],
 "name": "balances",
 "outputs": [{
  "name": "",
  "type": "uint256"
 }],
 "payable": false,
 "stateMutability": "view",
 "type": "function"
}, {
 "constant": false,
 "inputs": [{
  "name": "value",
  "type": "uint256"
 }],
 "name": "withdraw",
 "outputs": [{
  "name": "success",
  "type": "bool"
 }],
 "payable": false,
 "stateMutability": "nonpayable",
 "type": "function"
}, { ... }]
These two artifacts is all we need to deploy the contract into the network and we’re good to go. I should mention the truffle framework that is designed to simplify smart contracts creation, compilation, deployment and testing so you don’t have to use solc directly.
Remix 🔹
Remix is a pretty useful online IDE for smart contracts development. Instead of manually compiling our code we can use Remix to generate all artifacts with single button click.

Deploying the contract 📦
First, we need a network to deploy a contract to. We can definatelly use ethereum “mainnet” but it will cost us real money because it’s the network where all financial operations happen. A better way would be to create our own network locally with our machine being a single node. There is a great tool called testrpc that allows us to do just that with a single command testrpc. That will start a server on port 8545 that we can connect to. Also, it creates 10 accounts with 100 ETH each:
➜  ~ testrpc
EthereumJS TestRPC v4.1.3 (ganache-core: 1.1.3)

Available Accounts
==================
(0) 0xf70603197169311eef0b4119160e761366ea9a58
(1) 0x61dddfbf0b0db34dc9b49450396dea865b77a91b
(2) 0x6b9a7615e5fbdacda63426e3afcf9a16296f4748
(3) 0x6175f7e32a0e90ee3df52b4b0b27ae1974a823b4
(4) 0x8ed609eda1ca905d8a940613cbe40b5c43ee858a
(5) 0x8435ff8835147934266309749f704eb9c1097a46
(6) 0xcd46b4f28af0bc1971f33ab82b78966465a8b48f
(7) 0x7187b73d529072932ff4bdd318f520ee9609160f
(8) 0x49b8a7f82eebc28d4098b6f023f4efe7af4b4197
(9) 0x5a07a515c08cea38c18de1e557767b4c548c9aa5
Next, in order to connect and interact with the blockchain we will use web3js library (there are also implementations in python, haskell, and java):
npm install web3
At the time this article was written the latest web3 version is 1.0.0-beta.24, the api might change and it probably will (this is why most of tutorials on the web don’t work anymore).
Let’s start node console with node and initialize web3-eth module we’re interested in:
var Eth = require('web3-eth');

var eth = new Eth('http://localhost:8545'); // testrpc address

// example usage, should print the same testrpc generated accounts
eth.getAccounts(console.log);

/* ->
[ '0xf70603197169311EEf0B4119160E761366Ea9a58',
  '0x61Dddfbf0b0Db34Dc9B49450396deA865B77A91b',
  '0x6b9A7615e5fBDACDA63426E3afcf9a16296F4748',
  '0x6175f7E32A0e90EE3Df52b4b0b27ae1974A823b4',
  '0x8eD609EDa1cA905d8a940613cBE40B5C43Ee858A',
  '0x8435FF8835147934266309749F704eB9c1097a46',
  '0xCD46b4f28af0bC1971f33aB82b78966465A8B48F',
  '0x7187b73d529072932Ff4bDD318F520EE9609160f',
  '0x49b8a7f82eEBc28d4098b6f023F4eFe7AF4b4197',
  '0x5a07A515C08CeA38C18de1e557767B4c548C9aA5' ]
  */
Now, deploying new contract to the network is nothing more than sending a transaction to an empty address. That transaction has to contain our contract’s byte code as a payload:
// Initialization as before
var Eth = require('web3-eth');
var eth = new Eth('http://localhost:8545');

// ABI interface
var abi = [{"constant":true,"inputs":[{"name":"","type":"address"}],"name":"balances","outputs":[{"name":"","type":"uint256"}],"payable":false,"stateMutability":"view","type":"function"},{"constant":false,"inputs":[{"name":"value","type":"uint256"}],"name":"withdraw","outputs":[{"name":"success","type":"bool"}],"payable":false,"stateMutability":"nonpayable","type":"function"},{"constant":false,"inputs":[{"name":"to","type":"address"},{"name":"value","type":"uint256"}],"name":"transfer","outputs":[{"name":"success","type":"bool"}],"payable":false,"stateMutability":"nonpayable","type":"function"},{"constant":false,"inputs":[],"name":"deposit","outputs":[{"name":"success","type":"bool"}],"payable":true,"stateMutability":"payable","type":"function"}];

// The actual program
var bytecode = '6060604052341561000f57600080fd5b6101578061001e6000396000f300606060405260043610610041576000357c0100000000000000000000000000000000000000000000000000000000900463ffffffff168063cfae321714610046575b600080fd5b341561005157600080fd5b6100596100d4565b6040518080602001828103825283818151815260200191508051906020019080838360005b8381101561009957808201518184015260208101905061007e565b50505050905090810190601f1680156100c65780820380516001836020036101000a031916815260200191505b509250505060405180910390f35b6100dc610117565b6040805190810160405280600581526020017f48656c6c6f000000000000000000000000000000000000000000000000000000815250905090565b6020604051908101604052806000815250905600a165627a7a7230582025fd22ef32c724ed61b4a388c9fb894d3813ca36bcb56cc7adee9280154fdca10029';

// The account address to deploy contract from (transaction sender)
var myAccount = '0x5d407fa205c0233f58efe0a16e77264b30bdf696'

// Create new instance of a contract object passing our ABI
var contract = new web3.eth.Contract(abi);

// "deploy" takes bytecode and returns a transaction object
contract.deploy({data: bytecode})
.send({ // send submits the transaction to the network
    from: myAccount,             // our account
    gas: 1500000,                // how much has we are willing to spend for a transaction
    gasPrice: '30000000000000'
})
.then(function(newContractInstance){ // providing callback to a promise
    console.log(newContractInstance.options.address) // instance with the new contract address
});

// should print our contract's address, something like 0x65e1a34e9d3c0398478d584027f9075e2fcdd895274dfd3958779aac7a543713
That’s it, the output should be the address of our newly created contract.
Alternatively we can achieve the same with Remix: by going to the “Run” tab there is an option for setting an environment. Setting “JavaScript VM” is basically the same as running testrpc but it will be managed by Remix. To deploy a contract we just have to specify an account and click on “Create”.
Interacting with a contract 👋🏻
In order for anyone to interact with a contract they need two things:
- Contract address
- ABI interface
Using the same web3js library anyone on the network can do the following:
// Initialization as before
var Eth = require('web3-eth');
var eth = new Eth('http://localhost:8545');

// ABI interface
var abi = [{"constant":true,"inputs":[{"name":"","type":"address"}],"name":"balances","outputs":[{"name":"","type":"uint256"}],"payable":false,"stateMutability":"view","type":"function"},{"constant":false,"inputs":[{"name":"value","type":"uint256"}],"name":"withdraw","outputs":[{"name":"success","type":"bool"}],"payable":false,"stateMutability":"nonpayable","type":"function"},{"constant":false,"inputs":[{"name":"to","type":"address"},{"name":"value","type":"uint256"}],"name":"transfer","outputs":[{"name":"success","type":"bool"}],"payable":false,"stateMutability":"nonpayable","type":"function"},{"constant":false,"inputs":[],"name":"deposit","outputs":[{"name":"success","type":"bool"}],"payable":true,"stateMutability":"payable","type":"function"}];

// Our contract's address
var contractAddress = '0xE1f5074cDF9DE50b14441BE1026d11D113E51437'

// Create new instance of a contract object passing our ABI and its address
var contract = new web3.eth.Contract(abi, address);

// Lets deposit 10 ETH something
// The 'deposit' function doesn't take any arguments, the amount of ether is passed implicitly
contract.methods.deposit().send({from: '0xf70603197169311eef0b4119160e761366ea9a58', value: '10000000000000000000'})
.then(function(r) {
   console.log(r)
});

// Now lets withdraw 5 ETH back
// 'withdraw' takes one argument - amount of ether to withdraw (in wei)
contract2.methods.withdraw('5000000000000000000').send({from: '0xf70603197169311eef0b4119160e761366ea9a58'})
.then(function(r) {
   console.log(r)
});
Again, under the hood calling contract’s methods is nothing more than sending a transaction to it’s address that has method name and parameters as a payload.
Metamask 🦊
Metamask is a chrome extension that wraps web3js library and allows us to interact with ethereum network in a browser. The idea is that when you load a web page metamask injects a web3 object into javascript environment.
window.addEventListener('load', function() {

  // Checking if Web3 has been injected by the browser (Mist/MetaMask)
  if (typeof web3 !== 'undefined') {
    // Use Mist/MetaMask's provider
    window.web3 = new Web3(web3.currentProvider);
  } else {
    console.log('No web3? You should consider trying MetaMask!')
    // fallback - use your fallback strategy (local node / hosted node + in-dapp id mgmt / fail)
    window.web3 = new Web3(new Web3.providers.HttpProvider("http://localhost:8545"));
  }

  // Now you can start your app & access web3 freely:
  startApp()

})
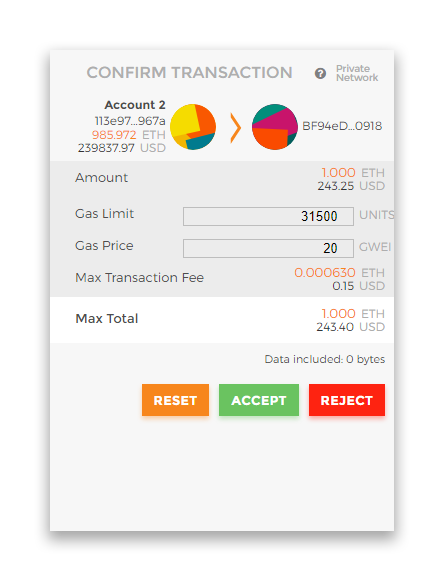
Lets say Alice created a web app with a pretty user interface that allows users to deposit and withdraw ether with a single button click. Eventually a transaction should be created that contains user’s account id and signed with a private key. Metamask can manage that, the calls to web3js are intercepted with the injected web3 object and appropriate action is taken, like showing a pop up asking for a user’s consent:
That means that Bob doesn’t have to know contract’s address or ABI or do any coding at all — he’s just a consumer of a user facing web app while metamask does all the work.
Another example of such kind of application is Remix IDE itself. With metamask installed and connected to your testrpc network (or any other network) you can go to Remix and pick “Injected Web3” in the environment settings. From that point every created transaction (either by deploying a contract or calling it’s functions) will go through metamask.
Gas ⛽️
Calling smart contract’s methods requires you to pay for execution. Every EVM operation requires some fixed amount of gas, the more complex your function is the more computational power it requires. Ethereum smart contracts allows arbitrary complex computations, a short length of code can actually result in a lot of computational work being done. Every miner will execute your contract on their machines using their electricity so it’s important to measure the work done directly instead of just choosing a fee based on the length of a transaction or contract. Gas is a unit that things can be measured in, there isn’t any actual token for gas. That is, you can’t own 1000 gas.
The question “How much 1 unit of gas worth” doesn’t make sense without gas price. The formula is ether = gas limit x gas price. The idea behind is that the price of an ether as a cryptocurrency is fluctuating depending on the market situation but the price of an operation doesn’t change. When you issue a transaction you have to specify the amount of gas you’re willing to spend and the gas price. The same program will cost more if gas price is higher. The reward for running a smart contract and creating a block goes to the miner so they’re interested in taking transactions with higher gas price.
I hope it all make some sense even though the concepts are not that complex. There are a lot of tutorials and information online, the problem is — different sources require different levels of understanding and it’s not easy to get a big picture. Most of the tutorials are broken and getting outdated really quickly. It definitely helps to get a solid understanding of a blockchain technology and commonly used terms. If you still haven’t watch video by 3blue1brown — you’re missing out. If you’re into podcasts — Software Engineering Daily has a ton of quality content on Ethereum.